I had a lovely box of goodies to play with for this months kit! It mainly consists of papers and embellishments from My Minds Eye collection called Miss Caroline, along with some Prima flowers and Jenni Bowlin crepe ribbon. I've made four projects with this kit and still have things left to do some more creating!
First up, an altered pencil pot, made from a cut down pringles tube and decorated with Miss Caroline papers, Jenni Bowling Crepe ribbon, a paper flower made from more paper and a button and pin from the same collection.
Next I made some simple circle bunting, which I've seen around but never made any, SO easy!!! Can't wait to make some more. Simply punch or cut some circles, ink the edges if you like and then run each circle through your sewing maching and hang! So sweet.
I used the flower from the prima flower pack and stuck it to some ruffled pink lace, added a pin to the back and voila! a new brooch!
And finally a layout! I used my own background paper from Pink Paislee, a Studio Calico alphabet and and Elles Studio date tag and the ruler strip is from Material Girl, but everything else is from the kit. A page all about my boy growing and this year moving to secondary school!
I hope I've shown how versatile these kits can be and how far they go too! Hop over to the shop and buy one now!
Have fun, Annie x
Tuesday, 1 May 2012
Sunday, 29 April 2012
One Word One Technique #18
Hi everyone it`s time for this weeks prompt for One Word One Technique.
For a reminder on how this works check out Maxines post here.
The prompt for week 18 is:
April Technique - Fabric
Word Prompt - Discover
This week i have branched out from my journal and went all out with fabric that i have had sitting around waiting on the right project to come along.
I gathered together my supplies along with a Versacraft ink pad and got stamping using my Tim Holtz stamp first and then heat set with a dry iron.
Cut to size and then out with the sewing machine for some stitching and an embellishment . . .
Next i took the American Crafts Alpha stamps and stamped Discover using the same steps as above.
This is the first time i have attempted to make a flower from material and it was sooooo easy . . .
I took a scrap of material,twisted it all up,then tightly started to roll it in a circle, fixing it in place with a hot glue gun.
Taking more of the material i cut to size and made into a tote,stitched the patches on ,added the flower and some buttons..
"BUT" I did have a problem when attaching my strap . . . the needle broke . . . but i think it was meant to be because on looking at it i have decided to "completly change it into a craft apron" as soon as i buy some calico,new needles and purple dye!!
Watch this space,lol!
I hope you all enjoyed looking at my project that i would never have got around to making without Maxines One Word One Technique which each month lifts me out my comfort zone and pushes my creativity even further. . . plus this beautiful material now has a use and will no longer be sitting in a pile at the back of a cupboard.
I hope this months technique and prompt inspires you to get creative and have a go!
If you do we would all love to see what you create and leave us a comment so we can pop around for a visit.
Till next time
Tracy
XOXO
For a reminder on how this works check out Maxines post here.
The prompt for week 18 is:
April Technique - Fabric
Word Prompt - Discover
This week i have branched out from my journal and went all out with fabric that i have had sitting around waiting on the right project to come along.
I gathered together my supplies along with a Versacraft ink pad and got stamping using my Tim Holtz stamp first and then heat set with a dry iron.
Cut to size and then out with the sewing machine for some stitching and an embellishment . . .
Next i took the American Crafts Alpha stamps and stamped Discover using the same steps as above.
This is the first time i have attempted to make a flower from material and it was sooooo easy . . .
I took a scrap of material,twisted it all up,then tightly started to roll it in a circle, fixing it in place with a hot glue gun.
Taking more of the material i cut to size and made into a tote,stitched the patches on ,added the flower and some buttons..
Watch this space,lol!
I hope you all enjoyed looking at my project that i would never have got around to making without Maxines One Word One Technique which each month lifts me out my comfort zone and pushes my creativity even further. . . plus this beautiful material now has a use and will no longer be sitting in a pile at the back of a cupboard.
I hope this months technique and prompt inspires you to get creative and have a go!
If you do we would all love to see what you create and leave us a comment so we can pop around for a visit.
Till next time
Tracy
XOXO
Sunday, 22 April 2012
One Word One Technique #17
The prompt for week 17 is:
April Technique - Fabric
This Week's Word - Comfort
There are lots of pre-made embellishments on the market these days using fabric. I am particular fan of the fabric brads that Crate Paper & Basic Grey offer. For this challenge I decided to make my own fabric button to use on my page. Here's what you'll need to make your own:
A scrap of fabric and some button shells, front and back. I happen to have a button covering tool but you can do without it and there are lots of other button making tools on the market.
Trace a circle onto your fabric and cut out. Place the circle face down in the rubber button covering tool and trim any excess fabric if necessary.
Tuck the fabric into the centre and place the button back over it. Use the plastic pusher to press the button back into the front.
Now you can just pop the button out and you are done! Here's what the back looks like:
And the front:
I use foam tape to attach to my layouts. Here's my layout for this week's prompt.
I hope you like this weeks prompt and as always please share your link in the comments if you play along.
Sunday, 15 April 2012
One Word One Technique #16
Here's the third 'One Word, One Technique' prompt for April :D
For a reminder of how 'One Word, One Technique' works, click here for Maxine's introduction.
The prompt for week 16 is:
April Technique - Fabric
This Week's Word - Bliss
I was trying to think of how I would describe 'bliss' and what that means to me. One thing that I love is being by the sea with my family and I found a photo of my daughter jumping the waves as the sun is setting, which summed it up perfectly for me.
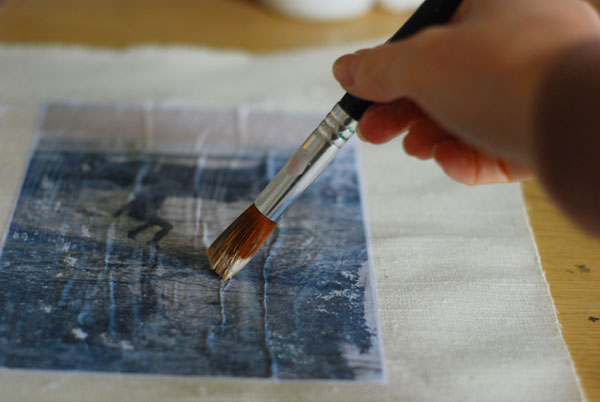
I decided to do a picture transfer onto fabric using gloss medium. Here is a simple tutorial of what I did.
1. Gather your supplies, fabric, gloss medium, a paintbrush and a photo

2. Paint a layer of gloss medium onto the fabric, the same size as your photo.

3. Place your photo face down onto the layer of gloss medium, then paint another layer over the top and leave to dry.

4. When almost dry, you should be able to peel away the photo paper. IF you find its a little difficult, just spray a little water and rub the paper away.

You will be left with an 'imperfect' transfer of your original photo, I love the creases and bits that didn't transfer completely.
5. Lastly embellish your image, I chose to sew on some flowers, add the word bliss with letter stickers, add a strip of lace and a simple running stitch along the edges to hold it all together.

I hope you like this tutorial and give it a try for yourself. Please link us up with your take on this weeks prompt, we'd love to see what you've done!
Annie x
Sunday, 8 April 2012
One Word One Technique #15
Here's the second 'One Word, One Technique' prompt for April :D
For a reminder of how 'One Word, One Technique' works, click here for Maxine's introduction.
The prompt for week 15 is:
April Technique - Fabric
This Week's Word - Explore
How are you doing with the prompts? Keeping up so far? I hope everyone's enjoying a lovely crafty Easter weekend!
This is my fifth journal page so far, and I think it just might be my favourite! I built up the background using spray inks and masks, and then added some painted circles, stamping and doodling. Finally, I grabbed a bag of silk scraps that I picked up from a fabric shop ages ago, and pulled out this gorgeous piece to add texture and dimension to my page.
The quote around the edge reads: 'Twenty years from now you will be more disappointed by the things that you didn't do than by the ones you did do. So throw off the bowlines. Sail away from the safe harbour. Catch the trade winds in your sails. Explore. Dream. Discover. Mark Twain. and then me, April 2012'
I hope you like my example this week - as always, if you join in with the prompts make sure to link us up in the comments below so we can come and have a look :D
Jules xx
Sunday, 1 April 2012
One Word One Technique #14
I can't quite believe we are on week 14 already! And it's the start of a new month so that means a new technique.
For a reminder of how 'One Word, One Technique' works, click here for my introduction.
The Prompt for Week 14
April Technique - Fabric
Word Prompt - Dream
I love using fabric and find it's a great material to use on layouts as it gives such great texture.
For my layout I played around with the new Prima Almanac papers and flowers and some washi tape too! I used fabric in a few different ways.
Firstly I created my title using fabric and felt squares. I started by printing some large letters in a simple font from the computer. I cut them out then traced around them onto some fabric. I didn't worry about the cut out bits in the middle of the letters, just simply cut around the outline. Then I placed each letter onto a fabric square and then stitched, using backstitch, the middle parts of the letters and created some different stitches around the outside of the letters.

Then I created a fabric yo yo, you can see how to make one of these from Alexa's mini tutorial here. And finally I used a strip of fabric to tie into a bow instead of using ribbon.


I layered up the gorgeous Almanac papers, along with some book paper and the washi tape. I left the top part of the butterfly paper open so I could add my journaling tags. And I finished it all off by adding a sprinkle of buttons and sticking the flowers and fabric in the corners.
I hope that this has inspired you to try using some fabric on your layouts and create your own title. If you create any projects we would love you to link them up so we can see!
And don't forget to go back and check out the previous 3 months projects!
Happy Crafting,
Maxine xxx
I love using fabric and find it's a great material to use on layouts as it gives such great texture.
For my layout I played around with the new Prima Almanac papers and flowers and some washi tape too! I used fabric in a few different ways.
Firstly I created my title using fabric and felt squares. I started by printing some large letters in a simple font from the computer. I cut them out then traced around them onto some fabric. I didn't worry about the cut out bits in the middle of the letters, just simply cut around the outline. Then I placed each letter onto a fabric square and then stitched, using backstitch, the middle parts of the letters and created some different stitches around the outside of the letters.
Then I created a fabric yo yo, you can see how to make one of these from Alexa's mini tutorial here. And finally I used a strip of fabric to tie into a bow instead of using ribbon.


I layered up the gorgeous Almanac papers, along with some book paper and the washi tape. I left the top part of the butterfly paper open so I could add my journaling tags. And I finished it all off by adding a sprinkle of buttons and sticking the flowers and fabric in the corners.
I hope that this has inspired you to try using some fabric on your layouts and create your own title. If you create any projects we would love you to link them up so we can see!
And don't forget to go back and check out the previous 3 months projects!
Happy Crafting,
Maxine xxx
April Kit - Be Amazing
Hi Everyone & happy April to you! This month's kit is now up in the shop and can be purchased here where you can see the full contents. I love the colours in this kit. It features the beautiful line from MME, Follow Your Heart 'Be Amazing' and something that is a personal favourite of mine, washi tape!
First up I have a layout to share. The hexagon paper was screaming to me to use my craft knife on it!
The 'honey blue' paper is my favourite of the whole collection. For this card I cut out several hexagons from it and used foam adhesive dots to make some of them 'pop'.
The 6x6 paper pads are ideal for cards and smaller projects as the whole design is scaled down. The designs of the MME paper are so beautiful they can be used directly on cards with little or no embellishment.
I like to use up every scrap of my kit. For this layout I used washi tape, ribbon and paper strips to mat my photo on.
And I used the same effect on a card, it's an ideal way to use up scraps!
First up I have a layout to share. The hexagon paper was screaming to me to use my craft knife on it!
It was really easy to cut out hexagons from the paper, and I backed another patterned paper behind the open spaces.
The 'honey blue' paper is my favourite of the whole collection. For this card I cut out several hexagons from it and used foam adhesive dots to make some of them 'pop'.
The 6x6 paper pads are ideal for cards and smaller projects as the whole design is scaled down. The designs of the MME paper are so beautiful they can be used directly on cards with little or no embellishment.
The Jenni Bowlin journalling cards make great embellishments for cards too.
And I used the same effect on a card, it's an ideal way to use up scraps!
Subscribe to:
Posts (Atom)