Showing posts with label blog hop. Show all posts

Tuesday, 3 July 2012

UKS Blog Hop - For The Love of Layering

Welcome to our tutorial in the UK Scrappers Blog hop!

If you are participating in the blog hop, you may have come here from That's Crafty. Make sure you check out UKS here to see the full list of blog links and info on the prizes! To qualify for the prize draw on UKS simply comment on each of the blogs taking part.

As a little extra from us everyone who comments on this blog post on Tuesday 3rd July will be put into a draw to win 1 of 2 prizes - One winner will receive a £5 voucher to spend in the shop and the second will receive their choice of an Echo Park Collection Pack!

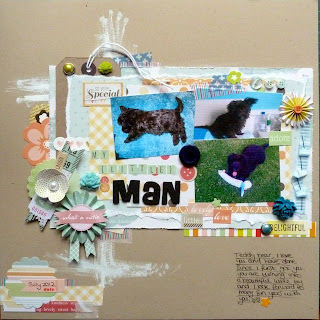
For our Project we will be showing you step by step how to make this layered up layout!!


Items I have used:

3x approx 2"x 3" Photos
Dear Lizzy Letter Stickers
Dear Lizzy Ephemera Flowers
Dear Lizzy Fair Ribbons
Dear Lizzy Accent & Phrase Stickers
Washi Tape
American Crafts Elements Pearl Brads
Prima Poppies & Peonies
Kraft Tag, buttons & Ribbon.

1. Choose your background paper - I went with Kraft.
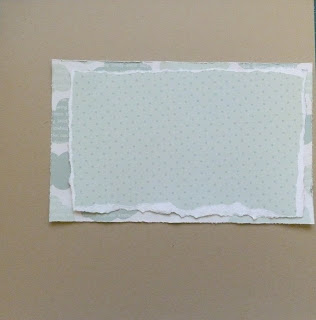
2. Cut 2 patterned papers into rectangles and distress/tear the edges. Mine measured approx 9"x5" and 10"x6".


3. Cut another 3 patterned papers to go behind your photos. Mine measured approx 6"x41/2", 71/2" x4" and 5"x5".
DO NOT STICK YOUR PAPERS DOWN YET!!


4. Take your papers off the background and dry brush some Gesso or paint onto the page.

5. Add a few stickers and strips of washi tape to places that will stick out from the edges of the paper.


6. Start sticking your papers to the page. Don't stick them right to the edge so that you can still tuck things behind.


7. Add some more stickers, your photos and tuck a tag behind the papers.


8. Add your title next to the photos and some journaling in the bottom right hand corner.
9. Add some strips of paper and washi tape to the bottom left corner and add a date sticker.
10. Finish off by adding more embellishments, ribbons, flowers, brads etc.


I really hope you have enjoyed this tutorial and have fun making a layered up layout!

Don't forget to check out all the other blogs in the hop by visiting UK Scrappers here.

Have fun and happy crafting!

Hugs and Periwinkles,
Maxine

Tuesday, 1 November 2011

UKS Blog Hop - Button & Paper Flower Bouquet

Welcome to our tutorial in the UK Scrappers Blog hop!

If you are participating in the blog hop, you may have come here from Scrap Revolution. Make sure you check out the thread on UKS here to see the full list of blog links and info on the prizes!

As a little extra from us everyone who stops by our blog and comments on this post can get 15% off their order with us up until Friday 4th! (This is only open to UK residents and those who comment on the blog, code can only be used once per person, if you do not comment here but use the code your order will not be processed and you will be refunded). To get this extra 15% off simply comment below and then used the code UKSBLOGHOP in the box upon checkout!

For our Project we will be showing you how to make this pretty Button and Paper Flower Bouquet.

For this project you will need:
-Buttons in various sizes (you can find a selection on our website here)
-Wire (needs to be strong enough to hold the bottons up when you stand them in a vase, I got mine from a garden centre)
-Pipe Cleaners
-Double Sided Patterned Paper - 1 12x12 sheet will make 3 flowers (You can see our Paper here, I used the Echo Park Dots and Stripes Candy Shoppe for my flowers)
-Wire Cutters/scissors
-Glue (I used Glossy Accents)
- Mica Mists (you can see our range of colours available here)
- Glitter Glue (I used Diamond Stickles)

Making the Button Flowers


Step 1: Make up piles of buttons going from biggest to smallest (5 or 6 buttons works best for these flowers)

Step 2: Cut your wire to double the length that you want your finished flowers to be. Mine measured 18". And fold in half.

Step 3: Start to thread your buttons onto the wire starting with the smallest first.


Step 4: Twist the wire close to the bottom button a few times so that they stay in place.

Step 5: Repeat for however many you want to make. I made 16 for my bouquet.


Making the Paper Roses

Step 1: Cut 3 4"x4" squares of paper. Fold each square in half on the diagonal 3 times (to create a small triangle)

Step 2: Cut each triangle into a petal shape and snip off the points.


Step 3: Unfold and you will have 3 - 8 petal flowers with a hole in the middle.

Step 4: Ink the edges of your flowers if you desire.

Step 5: Cut the flowers as follows:
Cut 1 flower in half, cut 3 petals off the second and cut 2 petals off the third.

Step 6: Now you need to start gluing your flowers. Apply glue to 1 of the end petals on the 6 petal, 5 petal, 1 of the 4 petal pieces and the 3 petal piece. Fold the other end petal over the glued one and hold until it sticks!

You will end up with the following:


Step 7: Now take your 2 petal piece and curl the ends back. I used the end of a paint brush.


Step 8: Curl the petals around the paintbrush (or your choice of pointy stick!) and glue in place. Make sure you leave a big enough hole in the middle so that you can fit the smaller single petal inside it.

Step 9: Take the half flower that you have left and cut 1 petal off. Now curl the end back and around your pointy stick as above. You will now have the following:

Step 10: Curl the petals back of each of the flowers.

Step 11: Now you can start to stack your flower. Start with the 2nd largest petal piece and apply glue to the bottom around the hole. Then place into the larger flower and hold until it has stuck!


Repeat the gluing until you only have the 2 smallest pieces left. Apply glue to the smallest piece and push into the other piece. Before you apply glue to that piece check to see if you need to trim it down by placing into the centre of your flower. If it sticks out the top too much just trim a bit off the end.

Now your flower is complete!


Step 12: Now you want to make your flowers shimmer and sparkle! I used a Mica mist to spray each of my flowers then added some stickles. Apply the stickles to each petal and then spread with a paintbrush or your finger!


Step 13: Now you need to add your pipe cleaners to the flowers. I started off with 12" ones and trimmed them down to 9" to match my button flowers. Make sure the hole in the bottom of your flower is big enough (you may need to trim it slightly) and thread your pipe cleaner into it. You can simple leave like that or apply some glue to the top of the pipe cleaner to hold it in place.


Step 14: Now arrange your flowers and buttons in your vase and you have a beatuiful arrangement that won't die and that you can make to match your decor!


I really hope you have enjoyed this tutorial and if you make a bouquet or some flowers we would love to see!

Don't forget to check out all the other blogs in the hop by visiting the UK Scrappers thread here.

Have fun and happy crafting!

Hugs and Periwinkles,
Maxine