Thursday 4 October 2012

Exciting News!


We have some exciting news here at Truly Madly Crafty. I can finally let you know that we are merging with Creative Hobby Supplies!


What does this mean for us? Well the Truly Madly Crafty website will continue to be open for orders until the end of the year and you will still receive the same service as always. But all of our stock will be moving over to the Creative Hobby Supplies website as well so you will be able to shop there with a wider choice of products! All of our stock will also now be available in the Creative Hobby Supplies bricks and mortar shop in Trowbridge, Wiltshire!

So what does Creative Hobby Supplies stock? They currently have Card Making, Jewellery Making and Candle Making supplies, which coupled with our Scrapbooking items will make a very crafty filled shop!

So stop on by the Creative Hobby Supplies website and check it all out and join the page on Facebook!


Sunday 16 September 2012

One Word One Technique # 37


For a reminder of how 'One Word, One Technique' works, click here for Maxine's introduction.
The prompt for week 37:

Technique - Distressing
Word - Giggle


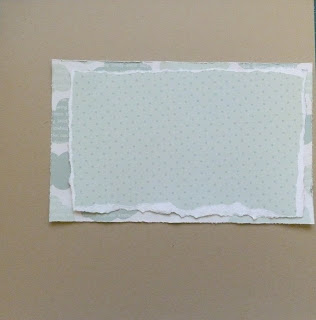
In crafting terms distressing is a technique used to alter paper or embellishments to give them an aged or well-worn appearance. Here I've used a simple technique to roughen up the edges of my paper. 


To recreate the technique, open your scissors out wide and scrape one of the blades against the edge of your paper. It's best to do this in the direction away from you. Try lightly at first and add more pressure as needed. Don't worry if you tear your paper, it only adds to the distressed look!


This is a quick and easy way to add a bit of texture to your projects. 


Sunday 26 August 2012

One Word One Technique # 35

Hi everyone,
Time again to share with you all my take on this months 
For a reminder of how 'One Word, One Technique' works, click here for Maxine's introduction.

This months Technique-Punches
          word prompt - Laugh

Here is another entry into my little old book ...
I pulled together paints,paste,chipboard alphas,MTE stamps,glossy accents,Distress ink pads,Distress ink,stapler,old tags from bought clothing{i save everything}and my heart punch.

The quote "Live Well,Laugh often,Love much" is one that to me should sum up our lives...i switched the sequence up a little so that i could have laugh as the starting point.

I hope this inspires you to have a go and please let us know if you do so we can pop along to your blog and leave some love.

Till next time
xoxox

Sunday 19 August 2012

One Word One Technique #34


For a reminder of how 'One Word, One Technique' works, click here for Maxine's introduction.
The prompt for wk 34:
Technique - Punching
Word - Passion


Punches are one of my go-to tools and are a fantastic way to transform the look of patterned paper & cardstock and  a good way to use up your scraps! On my page I've used a zig zag edge punch with cardstock and worked it into my design with patterned paper strips and ribbon. 


I've been hoarding this product since 2007! But using the zig zag punch has brought the page up to date with modern trends. I hope this inspires you to give your border punches a work out.


Sunday 12 August 2012

OWOT!

One Word One Technique #33

Hi everyone,
time for another One Word One Technique
For a reminder of how 'One Word, One Technique' works, click here for Maxine's introduction.
The prompt for wk 33:
Technique - Punching
Word - Fiery

Hi everyone it's Annie here with this weeks OWOT! I have to admit I had to look up the definition of the word fiery as I had a vague idea of it's meaning, but wasn't 100% sure. So I printed out the definition and used this as a starting point for my page, which started life as a piece of A5 cream cardstock.

I then gathered some papers that had an orange, brown and red colour theme running through them to emphasise the passion side of the word. I don't own too many punches, but with the ones I had I used them to add a background and little dots of colour through the page. I loved the way the negative hearts looked on the orange paper and used this in the centre of the page. I used a small circle punch to make a border of half circles near the top. I really just played with the shapes and colours until I was happy with the page!

I hope this will inspire you to get those punches out, especially if you never use them and just have fun with them!

Annie x

Sunday 29 July 2012

One Word One Technique #31

Hi everyone,
time for another One Word One Technique
For a reminder of how 'One Word, One Technique' works, click here for Maxine's introduction.

The prompt for wk 31:
Technique - Sewing
Word - Cherish 

Which for me meant another entry into my very old little worn book that i picked up at a car boot sale recently.
I gathered together the Acrylic paints,Smooches,Sepia Glossy Accents,Distress ink pads,Prima Doodle Deux Papers,assortment of stcker alphabets and some thread.
I was going to use my wonky tonky sewing machine BUT the needles keep breaking..hmmmm so i used a needle and made little stitch lines without the thread pretty randomly to start with.
Taking a needle and thread i added a few little kisses and stitched the lines on the right hand flower PLUS if you look at the right page it was starting to tear away SO i stitched a rough little line through a few pages to hold it all together. 

I love how this entry in my little old book turned out and will cherish it for sure.
I hope this has inspired you to have a go yourself and if you do "Please" pop back and let us know so we can visit you and leave some love.
Till next time
Hugs
Tracy
XOXOX

Sunday 22 July 2012

One Word One Technique #30

Here's your next 'One Word, One Technique' prompt for July:


For a reminder of how 'One Word, One Technique' works, click here for Maxine's introduction.

The prompt for week 30 is:

June Technique - Sewing
This Week's Word - Live

For my inspiration this week I went searching for some quotes. I can across this one by Thomas Jefferson "I cannot live without books." This is very true for me so I went about making a page about my love of reading & favourite books.

For my technique I incorporated stitching into my title. Here's how:

Start by writing out in pencil the word(s) that you want to stitch. I did mine by freehand but you could also use a stencil if you would prefer. 


Next pierce the holes along your pencil marks where you want your stitches to go.


Sew you title following the holes that you pierced to form you word. 


Here's the finished title.


And my layout, I also added a few extra stitched on the page to embellish. 


Thanks for stopping by and I hope you found some inspiration here. As always, please lead a comment if you've done a project inspired by this month's technique. 

Wednesday 18 July 2012

Bunting Kit & Blog Hop Winners!

Firstly my huge apologies on not announcing the winners of the UKS blog hop prizes sooner, so without further ado here are the winners:

#21 - Anita who has won an Echo Park collection pack of her choice (this includes any 12x12 pack found here except for Sweet Day and So Happy Together)

#44 - Sian who has won a £5 voucher to spend in the shop.

If you can both email me at sales@trulymadlycrafty.co.uk then I will organise your prizes for you :o)

Have you seen our new kit in sale this month? It is a gorgeous bunting kit so that you can make your own fab papers bunting. The kit comes with flags, string and embellishments all in white/kraft tones so that you can match it to your colour choices!


 Check out these fab examples created by our guest designer Michelle:


Aren't they gorgeous! You can buy the kit on the website here!

Hope they have inspired you to get making bunting!!
Happy Crafting
Maxine xx

Sunday 15 July 2012

One Word One Technique #29


Here's your next 'One Word, One Technique' prompt for July:


For a reminder of how 'One Word, One Technique' works, click here for Maxine's introduction.

The prompt for week 29 is:

June Technique - Sewing
This Week's Word - FREE

Here's my page for this week! I just had a bit of fun with this page, layering up little bits and pieces on top of a background that I made using watercolour crayons and acrylic paint. I then used my sewing machine to add a sewn freehand line to emphasise the word free.


 I hope you like this weeks page and the ideas I've used, please do link us to your creations as we'd love to see them.

Have fun, Annie

Sunday 8 July 2012

One Word One Technique #28


Here's your next 'One Word, One Technique' prompt for July:


For a reminder of how 'One Word, One Technique' works, click here for Maxine's introduction.

The prompt for week 28 is:

June Technique - Sewing
This Week's Word - Hope

This is art journal page #7 for me, and I can't believe how different they all are! I've been having a think about how to bind them together, and I'm considering mounting them all on kraft card first to give a little bit of consistency. I'll let you know how that goes!

Here's my July page:
I created my background with spray inks and acrylic paint. 
Then I stamped a couple of swirls, then put my page onto a WRMK Sew Easy piercing mat and used a needle to pierce holes along the swirls. I threaded the needle with some coordinating green embroidery thread and used a combination of back stitch and french knots to sew over the stamped swirl.

Hope you like my take on this week's prompt. If you create something using the prompt make sure you link us up in the comments, as we'd love to come and have a look!

Tuesday 3 July 2012

UKS Blog Hop - For The Love of Layering

Welcome to our tutorial in the UK Scrappers Blog hop!

If you are participating in the blog hop, you may have come here from That's Crafty. Make sure you check out UKS here to see the full list of blog links and info on the prizes! To qualify for the prize draw on UKS simply comment on each of the blogs taking part.

As a little extra from us everyone who comments on this blog post on Tuesday 3rd July will be put into a draw to win 1 of 2 prizes - One winner will receive a £5 voucher to spend in the shop and the second will receive their choice of an Echo Park Collection Pack!

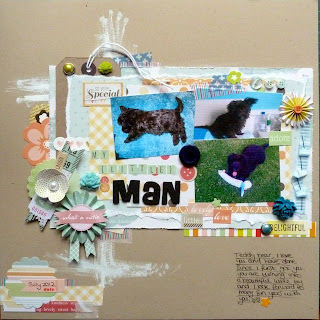
For our Project we will be showing you step by step how to make this layered up layout!!


Items I have used:

3x approx 2"x 3" Photos
Dear Lizzy Letter Stickers
Dear Lizzy Ephemera Flowers
Dear Lizzy Fair Ribbons
Dear Lizzy Accent & Phrase Stickers
Washi Tape
American Crafts Elements Pearl Brads
Prima Poppies & Peonies
Kraft Tag, buttons & Ribbon.

1. Choose your background paper - I went with Kraft.
2. Cut 2 patterned papers into rectangles and distress/tear the edges. Mine measured approx 9"x5" and 10"x6".


3. Cut another 3 patterned papers to go behind your photos. Mine measured approx 6"x41/2", 71/2" x4" and 5"x5".
DO NOT STICK YOUR PAPERS DOWN YET!!


4. Take your papers off the background and dry brush some Gesso or paint onto the page.

5. Add a few stickers and strips of washi tape to places that will stick out from the edges of the paper.


6. Start sticking your papers to the page. Don't stick them right to the edge so that you can still tuck things behind.


7. Add some more stickers, your photos and tuck a tag behind the papers.


8. Add your title next to the photos and some journaling in the bottom right hand corner.
9. Add some strips of paper and washi tape to the bottom left corner and add a date sticker.
10. Finish off by adding more embellishments, ribbons, flowers, brads etc.


I really hope you have enjoyed this tutorial and have fun making a layered up layout!

Don't forget to check out all the other blogs in the hop by visiting UK Scrappers here.

Have fun and happy crafting!

Hugs and Periwinkles,
Maxine

Monday 25 June 2012

One Word One Technique # 26

Hi everyone
Time for another One Word One Technique project.

If it`s your first time here then check out maxines post here for an introduction to OWOT.

The prompt for week 26 is:

June technique-Tearing
This weeks word -Challenge 

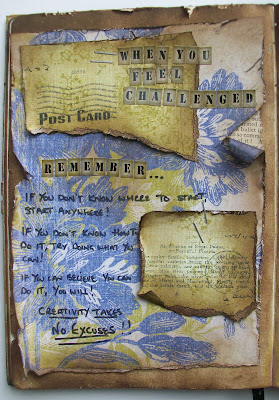
I don`t know about you but sometimes in my crafting i feel "challenged".
It`s as if my creative mojo has plain and simply gone on it`s holidays...not a fun time really!!

I came across a quote the other day while doing a little blog hopping and used part of it for my journal page.
{sorry i can`t remember the blog}

So with some old K&CO papers,old book page,alpha stickers,Walnut stain distress ink pad and a stapler i set to work and got into tearing and distressing to give my page a feeling of age.

The part of the quote i used:
If you don`t know where to start,
Start anywhere.
If you don`t know how to do it,
Try doing what you can.
If you can believe you can do it,
You will.
Creativity takes no Excuses!

Well thats all for me for now,hope you all have a crafty creative week.

Till next time
Tracy
xoxox

Monday 18 June 2012

One Word One Technique #25


For a reminder of how 'One Word, One Technique' works, click here for Maxine's introduction.

The prompt for week 25 is:

June Technique - Tearing
This Week's Word - Imagine


I really struggled with this week's word, I kept coming back to Ideal Homes magazine! So I settled on doing a card for my friend who has recently moved house. I'm going to include the greeting ' Congratulations on your ideal home'.

Tearing is a really simple technique & great for adding a little texture to a project, especially layered over another patterned paper or cardstock. 

Saturday 16 June 2012

apologies

I missed the latest OWOT post last Sunday, due to looking at the wrong calendar month, oops! I will endevour to redo my project with the correct word and technique and get it here asap!

Annie x

Sunday 3 June 2012

One Word One Technique #23


I hope everyone's enjoying the Jubilee weekend :D
Here's the first 'One Word, One Technique' prompt for June:


For a reminder of how 'One Word, One Technique' works, click here for Maxine's introduction.

The prompt for week 23 is:

June Technique - Tearing
This Week's Word - Nature

This is art journal page #6 for me, and I can't believe how different they all are - I've been creating them as individual pages and haven't really thought about how they'll look when they're all bound together!

Here's my June page:
I created my background with spray inks. I wet my page using a mini mister and then sprayed three colours over the top - yellow, orange and green. I mopped up some of the excess by laying another piece of paper over the top and then let them both dry.
I stamped the flower images and the quote straight onto the background, and coloured in the flowers using red spray ink and a paintbrush.
I then stamped the grass image and the last word of the quote onto the sheet of paper that I'd used to mop up the excess ink and tore round them. I also tore off a couple more pieces and layered them up at the bottom of my page. 
Hope you like my take on this week's prompt. If you create something using the prompt make sure you link us up in the comments, as we'd love to come and have a look!