Sunday, 20 May 2012

One Word One Technique #21


For a reminder of how 'One Word, One Technique' works, click here for Maxine's introduction.

The prompt for week 21 is:

May Technique - Mist
This Week's Word - Learn

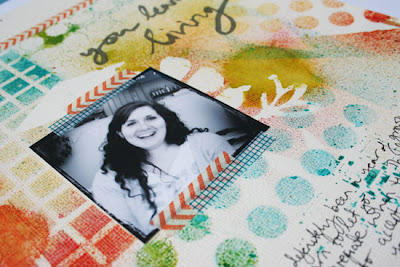
For this page I decided to make my background entirely from mist. I used a couple of templates but I also made my own masks using positive and negative punched shapes. This is a good way to experiment if you don't have any templates in your stash. Another trick is to use the templates as a stamp. Once I had used a template as a mask I flipped it over and pressed down on the cardstock transferring any mist onto the cardstock, this way you don't waste any ink! Be warned, your fingers will get very inky! Can you spot on my layout where I've used this technique? 


As you can see I created a totally unique background. I have so much fun experimenting and playing with mists that I usually create a couple of backgrounds all in one sitting, which I save for use at a later date.

I hope you enjoyed this week's prompt and as always, be sure to leave a comment if you play along with us!


Monday, 14 May 2012

OWOT 20

One Word One Technique #20

Sorry for the delay on this one, but here is this weeks 'One Word, One Technique' prompt for May:D


For a reminder of how 'One Word, One Technique' works, click here for Maxine's introduction.

The prompt for week 20 is:

May Technique - Misting
This Week's Word - Fun

I only have a few mists, but I love the effects you can achieve with them. This week I started off with an A5 size piece of cardstock and some packs of letter stickers I had hanging around. I then stuck down three lots of the word 'fun' onto the card and began misting!

I like to vary the size of the mist blobs that come out by changing how far away I spray them. Once you have let the page dry you can peel off the letter stickers to leave a lovely base for your page.

I then had 'fun' choosing random bits and pieces to layer onto my page, including book paper, tissue paper, mosaic tiles, punched butterflies. I just enjoyed the time to play around with various elements and sticking them onto the page.
I did a little search for quotes using the word 'fun' and found this one from Dr. Seuss. I typed it out in word, using the american typewriter font which is a favourite of mine for this kind of journalling. I then printed it out, trimmed into strips, inked the edges and stuck onto the page.

Hope you like this weeks technique and project and please do link us up with yours!

Annie x

Sunday, 13 May 2012

OWOT

Todays OWOT post will be here tomorrow, due to technical difficulties! x

Sunday, 6 May 2012

One Word One Technique #19

I can't believe it's May already, how did that happen?! Here's the first 'One Word, One Technique' prompt for May:D


For a reminder of how 'One Word, One Technique' works, click here for Maxine's introduction.

The prompt for week 19 is:

May Technique - Misting
This Week's Word - Enjoy

I love misting, so this month's technique is right up my street! I'm still keeping up with the art journal pages, so this month I thought I'd show you how I create a background using mists. Here's the finished page:
I started off with a blank piece of paper from a sketchbook, and some mists. I've used Dylusions spray inks,  and chose four complimentary colours; two shades of blue and two shades of green.
I spritzed both blues and the lighter green onto my non-stick craft mat
I then added a quick spritz of water
I took my paper and smooshed it onto the ink. I wiggled it a little bit, but not too much (you want to end up with bright colours, and if you wiggle too much they run together and end up looking more like mud!). I tend to spray a lot of ink and use a couple of sheets of paper and a small 'mop up' journal to pick it all up with - waste not want not right?!
This is what the first sheet looked like:
I dried the sheets and journal with a heat gun, and then went back and picked up a bit more ink around the edges. Here's the end result::
The next job is to add some detail, so I grabbed a couple of stencils (Dylusions again), and spritzed through one with the light blue and the other with the light green to give a tone on tone effect.
 And to show that you can use anything as a stencil I spritzed through this chipboard sheet, which is the waste from some counters for a board game (Ankh Morpork dollars in case you're wondering!). I used the darker green mist for this to make the circles stand out more.
This is what my pages and mop up journal looked like after all that misting
I added some gesso by scraping some through a stencil, and stamping some on with giant bubble wrap
At this stage I decided that I preferred the one on the left, so I added some stamping and doodling, and that was it!
I hope you enjoyed my tutorial, and have some fun with your mists!
Jules xx


Tuesday, 1 May 2012

May kit!

I had a lovely box of goodies to play with for this months kit! It mainly consists of papers and embellishments from My Minds Eye collection called Miss Caroline, along with some Prima flowers and Jenni Bowlin crepe ribbon. I've made four projects with this kit and still have things left to do some more creating!

First up, an altered pencil pot, made from a cut down pringles tube and decorated with Miss Caroline papers, Jenni Bowling Crepe ribbon, a paper flower made from more paper and a button and pin from the same collection.


Next I made some simple circle bunting, which I've seen around but never made any, SO easy!!! Can't wait to make some more. Simply punch or cut some circles, ink the edges if you like and then run each circle through your sewing maching and hang! So sweet.


I used the flower from the prima flower pack and stuck it to some ruffled pink lace, added a pin to the back and voila! a new brooch!


And finally a layout! I used my own background paper from Pink Paislee, a Studio Calico alphabet and and Elles Studio date tag and the ruler strip is from Material Girl, but everything else is from the kit. A page all about my boy growing and this year moving to secondary school!


I hope I've shown how versatile these kits can be and how far they go too! Hop over to the shop and buy one now!

Have fun, Annie x